
Assigning Authorization objects to Users in BI/BW
Assigning Authorization Objects to Users:
# Go to the screen
(RSECADMIN) , and click on assignment button under
user tab:

# Now we can assign the created
Authorization Object to any user using this tool.

# Adding the created Authorization
Object (ZDWKJTEST) to the user ZNBITSRTS. I will be using the same user through
out this blog for running any query so that it can use the restrictions which
are applying using the Authorization Object.


# We can also assign the authorization
to users through role/profile using the standard Authorization Object
S_RS_AUTH:

# User with Authorization Object
0BI_ALL is having full access to data, and can overwrite any other
Authorization Objects assignment to it.

# Query on InfoProvider with
Authorization Objects: Below is the test query in which I added the InfoObject
for which we created the test Authorization Object (ZDWKJTEST).

Maintaining Authorizations in BI/BW
SAP BI security is an
integral part of any BI implementation. Integrating all the data coming from
various source systems and providing the data access based on the user’s role
is one of the major concerns of all the BI Projects.
Security of SAP R/3-ECC systems
are based on the activities while SAP BI security is focused on what data user
can access. Security in BI is categorized by major 2 categories:
Administrative
Users – The
way we maintain security for administrative users is same as ECC security but
we have additional authorization objects in system which are defined only for
BI objects.
Reporting Users– We have separate tools(Analysis
Authorization) to maintain security for reporting users.
What is
Authorization Object?
It allows to check whether a
user is allowed to perform a certain action. Actions are defined on the fields,
and each field in authorization object should pass the check. We can check all
the Standard BI Authorization Objects using tcode SU21 under the Business Warehouse
folder:

 With the SAP BI 7.0 we have
new tool to maintain the reporting level security. We can access this new tool
using tcode RSECADMIN
which replaces the old RSSM tool of BW 3.x.
With the SAP BI 7.0 we have
new tool to maintain the reporting level security. We can access this new tool
using tcode RSECADMIN
which replaces the old RSSM tool of BW 3.x.
## Below are the Step-by-Step
instructions to create/maintain authorization objects for SAP BI Reporting:
I am covering the scenario
where each employee (Sales Team) is assigned with one territory number, and the
data should be accessible to employee based on their territory only. For this
scenario to work we have to set security restriction for the corresponding
territory InfoObject (ZDWSLTER).
# The first step before we create any
Authorization Object is to set all the InfoObjects as authorization relevant
for which we want to restrict data access.

Authorization
Objects on InfoObject’s of type Characteristic:
# For accessing the new Analysis
Authorization tools we use tcode RSECADMIN -> Authorizations Tab ->
Maintenance Button

# We can also use tcode RSECAUTH directly to come to
maintenance screen:

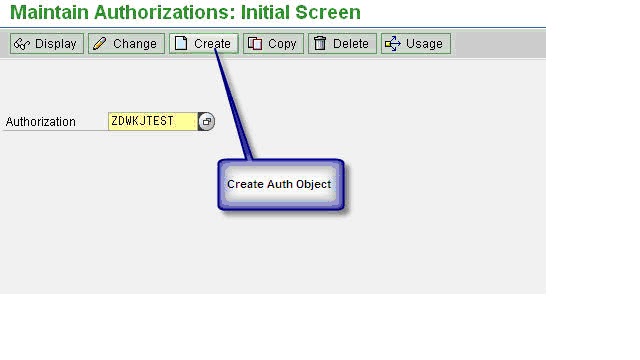
# We have to give the technical name
of the Authorization Object (ZDWKJTEST) then hit the create button:

# The very first step of creating any
Authorization Object is to add the special characteristics as field for
restirction:

# The below 3 characteristics are
mandatory for defining any Authorization Object. If we don’t have this we will
get no access to any InforProvider. By default this gives us access to all the
InfoProvider(Full Access), but we can also set the value of InfoProvider for
which we want the Authorization Object to work.

# Now I am adding the infoobject(ZDWSLTER) for which we
want to add restriction

# We can double click on the newly
added infobject, and can define the value which we want to allow for this
InfoObject. We can also set the dynamic value using Customer Exit Code which we
will cover later in this blog.

Authorizations in SAP NW BI

TOPICS
1. MODELING
Difference
between rssm and rsecadmin

RSSM
|
RSECADMIN
|
Old transaction: RSSM Concept of authorization: 'Reporting Authorization' |
New transaction : RSECADMIN Concept of authorization: 'Analysis Authorization' |
Assignement of Reporting
authorization:* by pfcg: mass distribution of auth by using role
|
Assignement of Analysis authorization :* by PFCG: mass distribution of auth by using role, |
Full Authorization:
SAP_ALL, SAP_NEW
|
Full Authorization: SAP_ALL, SAP_NEW |
Modeling:* IO marked as Authorization relevant, |
Modeling:* IO + Navigation ATTR can be Authorization relevant, |
-
|
New object authorization for Web application Designer & Report Designer:* S_RS_BTMP, |
Step by
Step
RSSM
|
RSECADMIN
|
|
0. Pre-requisites
|
-
|
Activate all business content related to authorizations before you get started:* InfoObjects: 0TCA* and 0TCT* Set the following InfoObjects as "authorization relevant":* 0TCAACTVT Add 0TCAIFAREA as an external hierarchy characteristic to 0INFOPROV (optional) |
1. Set Master data
Authorization relevant
|
RSA1 -> InfoObjects
-> Business Explorer Tab -> Flag 'Authorization relevant
|
RSA1 -> InfoObjects -> Business Explorer Tab -> Flag 'Authorization relevant RSA1 -> InfoObjects -> Attribute Tab -> Flag 'AuthorizRelevant' |
2. Create Authorization
Object/ Analysis authorization
|
RSSM -> Enter the
name of your Authorization object -> Create -> Put IO Authorization
relevant in the selected InfoObjects part -> Save
|
|
3. Set Info provider
|
RSSM -> Select:
'Check for Info Cubes' -> Change -> Flag the related Info Cubes
|
|
4. Create BEX variable
for authorization
|
1. Right click on the
IO -> choose 'Restrict'
2. Choose 'Selection' = 'Single Value' and 'from Hierarchy' = 'flat list' If a hierarchy exists, select the hierarchy for the IO 3. Go on the variables tab -> Right click -> 'New variable' 4. For a restriction without hierarchy, the type of variable is 'Characteristic Value' and if you have choose a hierarchy, the type of variable is 'Hierarchy node' 5. Select a variable name & a description 6. Choose 'Processing by': = 'Authorization' then check the characteristic and click 'next' 7. Choose the display area for the variable -> Variable represents: = 'Single Value' or 'Selection Option' 8. Choose if the variable entry is Optional or mandatory, 9. Don't select 'Ready for input' and 'Can be changed in query navigation 10. Next to the end |
|
5. Insert Authorization
in Role
|
||
6. Assign
Authorization/ Role to Users
|
Subscribe to:
Posts (Atom)