Step-by-Step Guide for using LSMW to Update Customer Master Records
LSMW to Update Customer Master Records with Transaction Recording
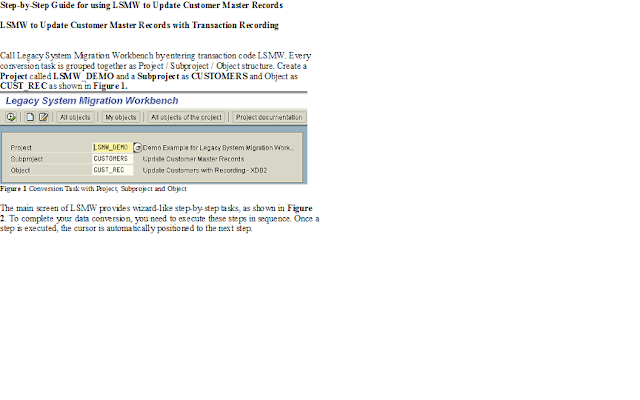
Call Legacy System Migration Workbench by entering transaction code LSMW. Every conversion task is grouped together as Project / Subproject / Object structure. Create a Project called LSMW_DEMO and a Subproject as CUSTOMERS and Object as CUST_REC as shown in Figure 1.
 Figure 1 : Conversion Task with Project, Subproject and Object
The main screen of LSMW provides wizard-like step-by-step tasks, as shown in Figure 2. To complete your data conversion, you need to execute these steps in sequence. Once a step is executed, the cursor is automatically positioned to the next step.
As a security consultant we will involve from 7th stepi.e Specifying file path
Step 7: Specify files
In this step, we define how the layout of the input file is. The input file is a [Tab] delimited with the first row as field names. It is present on my PC (local drive) as C:\XD02.txt. (See

Create an Excel file (Figure 14) with your data and save it as a Tab-delimited text file on your local drive (C:\) and name it XD02.txt.
figure 14 Source data in Excel file (saved as Tab delimited file)
 Step 8: Assign files
figure 14 Source data in Excel file (saved as Tab delimited file)
Execute step ‘Assign Files’ (Figure 15) and the system automatically defaults the filename to the source structure.
 Figure 15 Assign file to Source Structure
Step 9: Read data
In this step, LSMW reads the data (Figure 16) from the source file (from your PC’s local drive). You have the option to read only selected rows and convert data values to Internal format.

Figure 16 Read Data
Figure 16 Read Data
Step 10: Display read data
This step (Figure 17) is optional. If required, you can review the field contents for the rows of data read.
Figure 17 Display Read Data
 Step 11: Convert data
This is the step that actually converts the source data (in source format) to a target format. Based on the conversion rules defined, source fields are mapped to target fields.
Step 12: Display Converted data
Again this is an optional step to view how the source data is converted to internal SAP format (Figure 18).

Figure 18 Display Converted Data
Step 13: Create batch input session
Once the source data is converted in an internal format, you can create a batch session to process updates (Figure 19).
 Figure 19 Create Batch Input Session
Step 14: Run Batch Input Session
You can execute the BDC session by Run Batch input session. Executing a batch input session is a standard SM35 transaction for managing BDC sessions. Once you have successfully executed the batch input session, the customer master records are updated in the system. You can confirm this by viewing the customer master records (XD03).
Note! Browsing thru these 14 steps, you may get a feeling that this is a very lengthy and time-consuming activity. However, for the purposes of demonstration, I have made it detailed. Although it looks lengthy, actually it takes hardly few hours from start-to-finish! After playing around with few simple LSMW scripts, you will find it so easy to change and create more complex ones.
For more information visit www.keylabstraining.com
For more information visit www.keylabstraining.com
Thank you. for wonderful article. It has more Information in Your Website sap videos.
ReplyDeleteThank you. for wonderful article. It has more Information in Your Website sap video.
ReplyDeleteThank you. It is such a wonderful post. it has great information it is very useful for sap video download.
ReplyDeleteI am glad that I saw this post. It is informative blog for us and we need this type of blog thanks for share this blog, Keep posting such instructional blogs and I am looking forward for your future posts.
ReplyDeleteCyber Security Projects for CSE
JavaScript Training in Chennai
Project Centers in Chennai for CSE
JavaScript Training in Chennai
This comment has been removed by the author.
ReplyDelete